Esprit Wiring Guide
for installation of an aftermarket headset/stereo into your Esprit
and what else you can do when the glovebox is out.!
By Julian G
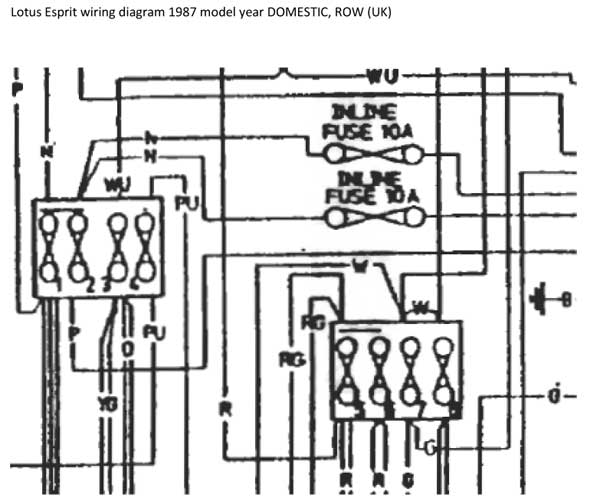
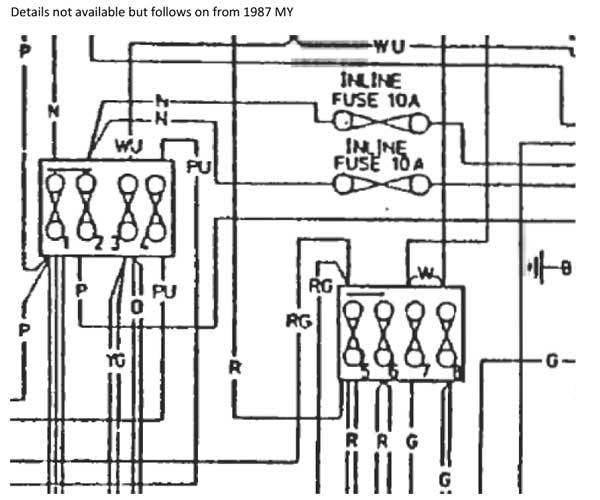
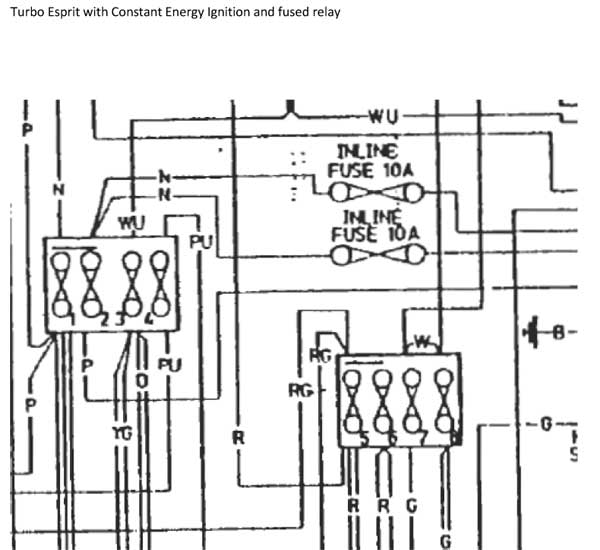
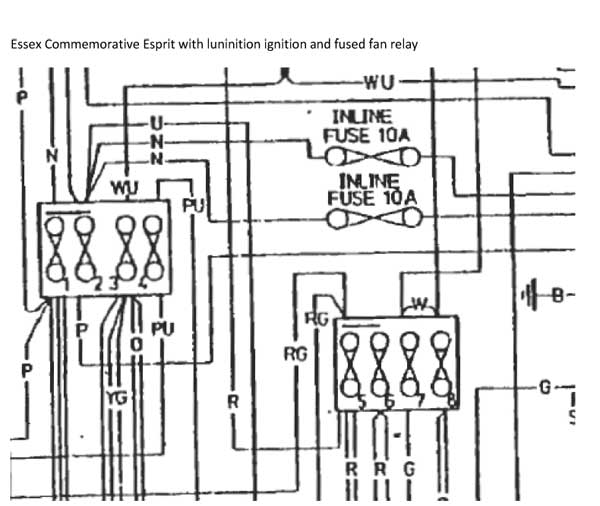
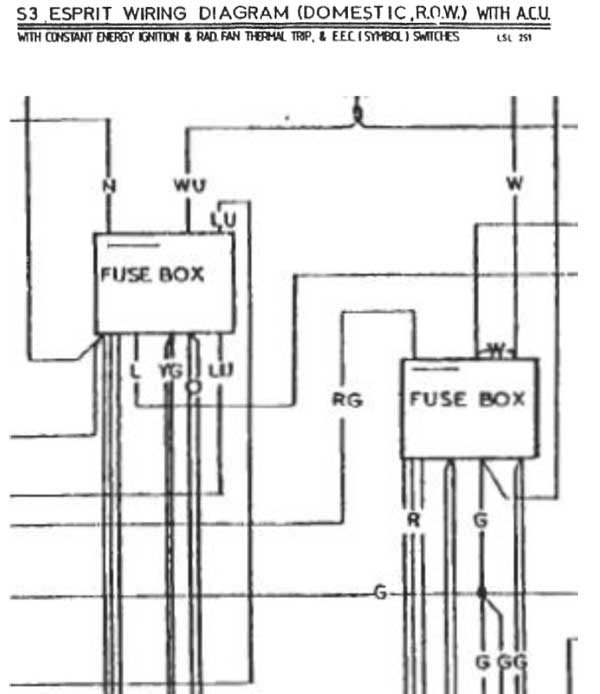
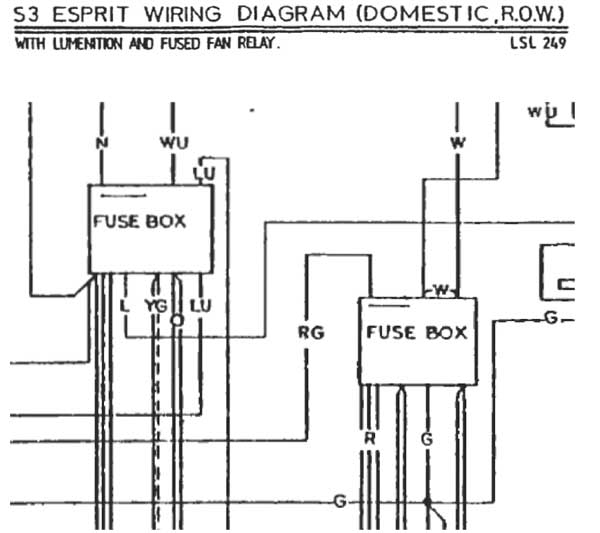
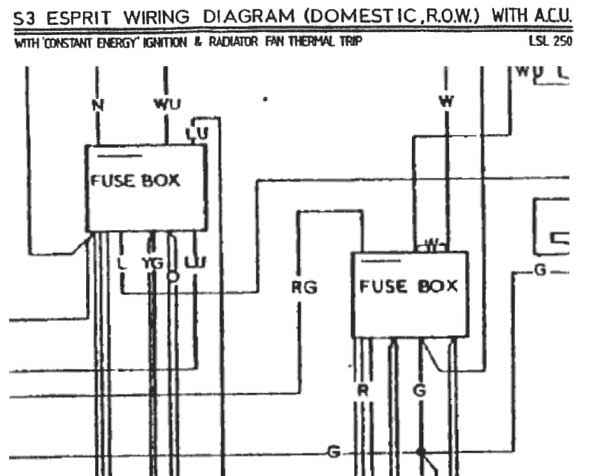
This guide will allow you to locate the wire connections in your Esprit fuse box for your choice of headset/stereo. The fuse boxes (two of them) are located on the right hand side of your Esprit glovebox. This wiring example is based on a 1986 Hc Esprit, a scanned document showing wiring plans for Esprits 1980 to 1987 are provided as a guide to the wiring changes although not much did change for this type of endeavour. NOTE: Disconnect battery before starting out on this project, please!
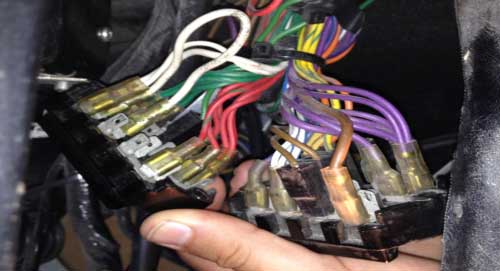
NOTES: The Lucas fuse box has spare blades to connect to which is good, if you need more you can purchase multi-blade connectors, basically piggy-backs
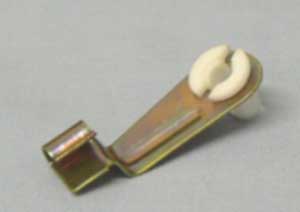
4 to 6 hours (includes glovebox and centre console removal) – Removal of the glovebox is required and this can be tricky but not impossible, just ‘Lotused’. There are 2 bolts for each of the two fuse boxes and these are removed to dislodge fuse boxes from glovebox. There are also screws at the rear panel of the glovebox which hold the electrical devices for the delay unit, flasher unit, hazard unit and other electrical boxes of tricks, these need to be removed to enable glovebox to be dropped out (through the bottom of the dash board, not through the top towards you). Two or three bolts hold the top of the glove box to the scuttle beam and are straight forward to remove. Pulling the glovebox out from the bottom may result in it cracking but if like me you will get the interior of the glovebox lined with a quality fabric then no drama there. BONUS ROUND! If your bonnet catch on the left hand side is inoperative this is the golden opportunity to fix it whilst the glovebox is out, mostly it’s the pivot hinge that has failed and these are available and cheap as chips at Steve’s shop SJ Sports, part number A075U6033Z
That said you may need to fettle the release arm length and this is done by screwing in or out to adjust length to ensure clip does not get bent (over reaching) and to also to help make the bonnet shutline even.
ALSO: I used the space provided by the absence of the glovebox to remove the 1970s electric antenna and had the hole professionally filled in. to replace antenna I installed a flush amplified windscreen mount antenna onto the top windscreen edge and chased the wires along the inside of the headlining and down the ‘A’ pillar. Caution, removing the headlining board completely can be precarious, if only needing to shift a little to get antenna wires poked through then you should only need to slowly release the screws enough to get a space to poke through antenna wires. A problem encountered when reinstalling the headlining after having it totally removed was the wood trim supporting it (glued to the fiberglass roof) was brittle and split but we got there in the end, i used this opportunity of removing the headlining to get the headlining re-trimmed as fabric was paper thin and showing its age.
You will need the following parts:
A new headset/stereo, 2-way male/female connector (note, the fuse boxes have normally have spare male terminals but Just in case someone got there before you…
You will need the following tools:
Phillips head screwdriver, ¼ drive sockets for bolts, small ring spanners 7,8,9,10mm, wire cutters, needle nose pliers.
Wiring
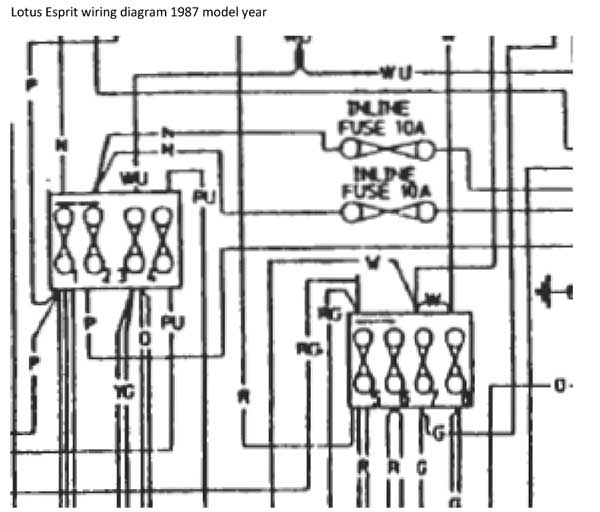
Lotus Fuse Box Wiring for fitting aftermarket Headset/stereo unit (located in glovebox RHS) S3 1986 Hc example deduced using the S3 1980 – 1987 Lotus manual electrical plan diagrams, You may find evidence of Model-Year cross-overs in the wiring, for example I ended up with a left-right switch under the dash for the mirrors AND a left-right rocker switch for the same on the driver’s door arm rest :/ Also as a rare act of charity Lotus, God bless them, pre laid the wires for the front and rear speakers even if a stereo was not a selected option, but recommend not using as modern audio wiring is of superior quality, the wires in the Esprit are getting long in the tooth.
NOTES: The Lucas fuse box has spare blades to connect to which is good, if you need more you can purchase multi-blade connectors, basically piggy-backs
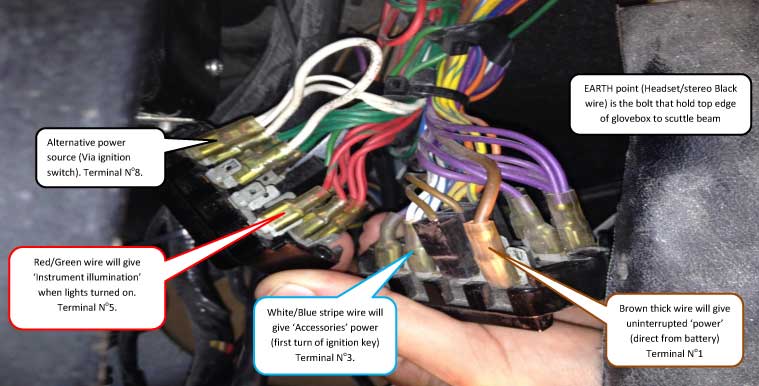
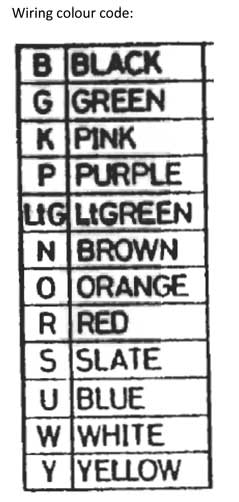
NOTES: if connecting a stereo/headset unit which is already ‘fused’ (either in the power supply wiring or built into the rear of the stereo/headset) connect wiring to the side with direct power to avoid ‘double fusing’ (the side with the White, Red-Green, White-Blue and Brown wires). Wiring typically (accepted universally and often referred to as a ‘DIN’, the German Institute for Standardization) for headsets/stereos is as follows:
- ‘RED’ power wire connect to ‘accessories’ so connect to Terminal No3, this will give you power on the first turn of the ignition key.
- ‘Orange/White wire for illumination (when lights turned on) connect to Terminal No5,
- ‘Yellow’ wire for memory power supply (constant power) connects to Terminal No1 or No8.
NOTE: If you are considering doing the electric windows power reroute to avoid the window switches getting a flogging and instead using relays you can use either Terminal No1 or No8 to rewire power windows.
Lotus Esprit 1986-87 fuses legend:NOTE: Lucas Electrics by their convention would rate fuses at two levels – ‘Continuous’ and ‘Blow rating’ this is why you may find a fuse (Lucas) with two ratings stamped on it such as 17/35Amps, this means the fuse can handle a constant 17 Amps but will blow when exposed long enough to 35 Amps. This allows for example electric motors needing a jolt of power to kick over then settle into its normal operating amperage, you may have experienced this when someone turns on a heavy duty electrical device and the house lights dim then return to normal glow within a few seconds.
FUSE CIRCUIT N0
FUSE RATED CONTINUOUS LUCAS Electrics (X by 2 for Lucas specified blow ratings eg 5 Amp = 10 Amp Blow rating)
4
5 Amp
9 (not in fuse box, possibly in fused headlamp relay)
10 Amp
1, 2, 3, 5, 6, 7, 8
17 Amp
(you may see this one as 17/35 Amps as Lucas fuses will blow, eventually, if exposed to double their initial amperage, same applies to the 5 & 10 Amp fuses above)
Sourced <http://www.theymightberacing.com/default.aspx>
British Lucas Fuse ~ American BUSS Fuse
Fast Blow Dual Rating ~ Continuous (AGC) Alternate Opinion (SFE ?)
50 amp 25/50 amp ~ 25 amp 25 amp SFE
35 amp 17/35 amp ~ 17 amp 20 amp SFE
30 amp 15/30 amp ~ 15 amp 15 amp SFE (too short ?)
25 amp 12/25 amp ~ 12 amp 15 amp SFE (too short ?)
20 amp 10/20 amp ~ 10 amp
15 amp 7.5/15 amp ~ 8 amp
10 amp 5 /10 amp ~ 5 amp
5 amp 2.5 / 5 amp ~ _____ 3 amp
2 amp 1 / 2 amp ~ 1 amp
FUSE NoFunction
1
Headlamp motors, Headlamp Flash, Horn & Horn Relay, and Hazard Circuit. Interior Lamp Delay & Clock Memory
2
Heated Rear Screen, Interior Lamp
3
Aerial Trigger, Air Conditioning Unit, Radiator Fans Relays
4
Headlamp Flash Relays
5
Panel Rheostats, Right Hand Lights
6
Left hand Side Lights
7
Instruments, Heated Rear Screen Relay, Windscreen Wiper, Stop Lights.
8
Direction Indictors, Reverse Lights.
9
Headlamp Motors (this fuse in independent from fuse blocks in glovebox and is lost in spaghetti of wiring)
Sourced <http://www.theymightberacing.com/default.aspx>
Lucas Electrics Humor, recommended reading only for the unkind and/or those who grew up on English humour :/ <http://www.mez.co.uk/lucas.html>
Information on typical Lucas wire colors and purpose <http://www.obcc.ca/lucas.htm>
Automotive Electrical Fuses -- British Vs American (Tim Engel’s opinions – use at your own discretion)
British and American standards for rating electrical fuses are different. Both provide an “Amp Rating” for very similar looking fuses, but the two ratings mean very different things. The US system rates the fuse based on the continuous load it can handle for a specified period of time w/o blowing, whilst the British system expresses the load at which the fuse will immediately blow.
That’s a significant difference! As an example, the 35 Amp fuse called out for many 1950’s/ 60’s/ 70’s vintage Britcars (Lotus Elan & Europa for sure) is roughly equivalent to a US-spec BUSS AGC 17 Amp fuse. Install a US 35 Amp fuse into your LBC fuse box and the wiring harness will melt down before the fuse blows.
DO NOT use a USA rated 35 amp fuse in your vintage British car!
The complete rating for the specified 35 amp Lucas fuse is…
“17 AMPS CONTINUOUS / 35 AMP SURGE”
Early British fuses were simply marked with the quick-blow rating, but later fuses are given two ratings in an effort to minimize the confusion. For instance, the 35 Amp fuse is often marked as “17 continuous/ 35 blow”, or simply 17/35. In that case, use the lower “continuous” rating as the one to which you try to match an American BUSS fuse rating. Or, better yet, proper British fuses are available from your favorite independent Britcar / Lotus parts dealer. Purchase a supply and keep them in your Lotus' glove box.The comparison/ substitution looks something like this...
British Lucas Fuse ~ American BUSS Fuse
Fast Blow Dual Rating ~ Continuous (AGC) Alternate Opinion (SFE ?)
50 amp 25/50 amp ~ 25 amp 25 amp SFE
35 amp 17/35 amp ~ 17 amp 20 amp SFE
30 amp 15/30 amp ~ 15 amp 15 amp SFE (too short ?)
25 amp 12/25 amp ~ 12 amp 15 amp SFE (too short ?)
20 amp 10/20 amp ~ 10 amp
15 amp 7.5/15 amp ~ 8 amp
10 amp 5 /10 amp ~ 5 amp
5 amp 2.5 / 5 amp ~ _____ 3 amp
2 amp 1 / 2 amp ~ 1 ampUnfortunately, there’s no extra data marked on either the fuse body or on the package to tip-off the user that the ratings are different. It’s very important that USA owners of British cars be aware of the issue and make wise choices when using USA fuses in them. The best choice is to make the effort to source proper British fuses for your LBC. In an emergency, the loose Rule of Thumb is to use a USA BUSS fuse with an Amp rating equal to no more than one half of the British Lucas fuse rating.
USA BUSS fuse terms:
SFE fuses are "automotive" and rated to interrupt only 32 volts. Their length depends on their current rating, ranging from 5/8" for a SFE-4, to 1-7/16" for a SFE-30 (lower amperage = shorter and higher amperage = longer). So, size-wize, sometimes higher amp rating SFE fuse will work in place of an "AGC" or an "AGA"… or a Lucas fuse. Regardless of physical size, an SFE will always blow more quickly than a current AG__ (or older __AG) that has a similar Amp rating.
AGC fuses are “General Purpose”. They are always 1/4" Dia X 1-1/4" long. They’re available in 250V ratings to 10 amps, and up to 32V ratings to 30 amps. AGC fuses are approximately the same length as British fuses, and will fit in the Lucas fuse holder. An AGC-20 is the same length as an SFE-20… they are pretty much interchangeable.
Both AGC and SFE are "fast acting", but according to BUSS charts, the SFE is faster. An AGC-20 is rated to carry 27 amps for up to 60 minutes, while an SFE-20 will blow in under 2 minutes. However, the 60 minutes is given as a maximum, while the 2 minutes is apparently typical, so that may not be an accurate comparison. Without getting too lost in the details, the basic idea is that an SFE will blow faster than an AGC, and will better protect your LBC’s vintage wiring.
If you are going to use BUSS fuses in your LBC, then when availability and length permits, use SFE fuses as your first choice. When you must use AGC fuses, shop for the 32 volt rated versions first, but the 250 volt AGC fuses will “work”. SFE fuses in lower Amp ratings will be shorter than the Lucas fuses and may not fit the Lucas fuse box properly, so use common sense.
Currently BUSS AG fuses are available in different lengths, denoted as AGA, AGB and AGC. They are all available in the same voltage and current ratings, the difference being in the lengths. AGA is the shortest, and lengths become longer as they progress from A through C.
Previously, the AG fuses were differentiated on a number scale, 1AG, 2AG and 3AG.
The older "3AG" fuses are the same as the modern, common "AGC" fuses.
Similarly: 1AG = AGA and 2AG = AGB
I don't believe stores or catalogs list "3AG" or "1AG" fuses anymore; they just list the current designation "AGC" or "AGA" now.USA fuse styles (The difference between them is their length)
Current – – OLD designation (no longer sold)
AGA – – – – 1AG
AGB – – – – 2AG
AGC – – – – 3AG (1/4" Dia x 1-1/4", fit Lucas fuse holder)
SFE – – – –*~*~*~*~*~*~*~*~*~*~*~*~*~*~*~*~*~*~*~*~*~*~*~*~*~*~*~*~*~*~*~*~*~*~*~*~*~*~*~*~*~*~*~*~*
Verdict
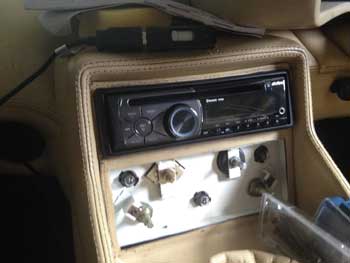
It works! J by taking out the glove box you will have access to many areas such as electrical boxes of tricks being the light delay unit (mine was missing so ordered one to see what it will do when re-fitted), hazard flasher, flasher unit and a couple of others that have me baffled. Installing the headset/stereo with the glovebox out is essential to access the wiring at the fuse box ‘easily’ – a term used by Lotus owners soberly, and to install the stereo/headset into the space provided for the stereo/headset in the centre console, you may have to fettle the ‘DIN’ (meaning the sized metal surround that will fit the standardised stereo/headset size) metal hole due to the corners being rounded and not square but a Dremel type tool with the appropriate cutter disk will make short work of this (make sure you contain sparks when cutting!).
The fitting of front and rear speakers is another endeavour and if undertaking do be prepared as it will need removal of the dash console and clever use of bolts and nyloc nuts instead of screws for front speakers due to windscreen rake (a Dremel type tool in invaluable here), rear speakers are straight forward BUT be mindful of speaker depth, from memory you only get around 60mm so if going deeper you will need spacers but not too much that you cannot close the doors and/or avoid the seats!
This mod was performed by Julian G on his 1986 Esprit
If you have any comments on this article email: admin@lotusespritworld.com
![]()
|
|