LED Light Replacement
Your interior lights, if left on, can
kill a battery. So replace them with LED's
by
Carl Pedersen
Having recently purchased my first Lotus (82 Turbo Esprit) , and embarked on the restoration, I discovered some pretty nasty electrics, of which I'm certain most readers will have had some experience with at some point. In my case, the lamps backlighting the window switches, had been bodged in place, (not necessarily by Lotus), but regardless, had actually melted the switches, and one lamp was also now defective.
With new Lotus switches costing £39.58 EACH, this is no laughing matter, let alone the cost of new lamps, and only to end up with similar problems at some point in the future. On stripping out the heater controls, (not the easiest of tasks), I also discovered one defective lamp. With about one hours labour just to change a lamp, this again is time I'd rather spend driving the car. Yet again I found problems on the red door lights, the lamps had partially scorched the plastic. But at least changing the lamps is a five minute job in this case.
So having a think about this problem, lamp life span, labour time etc, I wondered about the recent developments in 12 Volt LED packages, and a little research on the internet provided a wealth of rubbish, but also a nice UK supplier dedicated to supplying all kinds of LEDs.
So why LEDs?
Here are a few reasons.
1 Lamps are basically pretty inefficient, with about 50% of energy lost as heat. Most LEDs in the class appropriate here are closer to 95% efficient.2 Lamp life cycles are pretty short, and lessen greatly when heat is not dissipated. LEDs, generate virtually no heat, and most will run for 100,000 hours. (That's over 11 years continuous use). You will only ever install LEDs once, and never need to change them again, and anyone admiring the car will be none the wiser, a non Lotus part is hiding inside. 100,000 hours is an average life span, and in reality that is more than 90 years even if you drove 3 hours every day!
3 Lamps do not cope with vibration when hot, again knocking back the life span. Vibration is not even applicable with LEDs, as they are sealed packages, and have no fragile filament like lamps. Lets face it, you feel the road in a Lotus, but then so do the lamps!
4 Lamps draw a relatively high current. LEDs, will draw about 90% less, while delivering the same light levels.
5 Lamps suffer a high failure rate, because 90% of installers touch the glass envelope with their fingers resulting in skin oils glazing the surface, which again blocks light, and reflects back heat, knocking up to 50% off the life span. (With projection lamps, they will blow instantly) Again in theory this does not apply to LEDs, however regardless of your choice of lamps or LEDs, neither will emit as much light covered in greasy finger prints etc, but the LEDs will not die from it like lamps will. My advice, wear a cotton glove, or handle with a tissue, and always clean them first.
6 All the lamps in the Lotus (perhaps excluding head lights), have a tungsten filament, and as such the wavelength of light emitted tends to be at the yellow/red end of the spectrum. So filters are used to create other colours, such as green, red, amber etc, and these will also fade in time, AND block light. LEDs on the other hand generally emit only a specific wavelength, (apart from white LEDs of course) but the point here is, if you want green, you get only green light, and therefore it is virtually impossible for a green LED to fade a green filter. Actually for those with faded green filters like my cigar lighters, the LEDs in fact virtually restore the green colour to the plastic!. So taking this into account, even if you are a purist like me, and trying to use only original parts in your restoration, it hits pretty hard when you see an £80.00 bill for two plastic switches, because the original ones were rendered inoperative, brittle and cracked because of some lamps.
7 If you buy the correct LEDs, (like most listed here), you do not even have to worry about polarity, or inline resistors, voltage regulators etc. (the plug and play cliché applies). (There are exceptions and you have many options at UltraLEDs) e.g.. for the type (286) Dash Board Slim wedge bulb Green (New Brighter) polarity IS important, but not resistors as they are all 12V.
8
One possible drawback with LEDs is they cannot be easily dimmed in the Esprit, well not without some fairly serious modifications to the rheostat. The dash board lights, have a rheostat to adjust the backlighting intensity, and there is a second rheostat to adjust the heater controls backlighting. LEDs being LEDs cannot be dimmed in this way, as the rheostat is balanced to the lamp circuit, assuming high current lamps are in there, So the effect with LEDs, is simply all or nothing. When you reduce the intensity, they do not dim, and just before the end stop, they switch off. So you do have some control, but it is not very subtle. How relevant this is will depend on the user preference.
Shopping (have a look at UltraLEDs website)
They were great, I ordered late in the evening, and had everything a day later. www.ultraleds.co.uk. This site is MASSIVE, so it took quite some time to work out what I wanted, and I would be very surprised if they do not have what you will need, regardless of model or year.The nice thing is all the LEDs are available in the same packages as the original lamps. So you do not need any voltage regulators, resistors etc, voltages are from 11~15 in most cases, provided you look in the cars section, and because the packages are identical to the lamps, they slot straight into the sockets in your Lotus, no cutting wires, or soldering is required. And of course you could refit the original lamps if you so preferred.
To give you a practical idea, and perhaps save you some time deciding, here is what I ordered. For the 501 and 286 package types, (they are a defined standard size), matching the lamps with the same designation. (These are used in the window switches, cigar lighter, and dashboard lights, including the heater) For the 239 package type, you must specify the length of the lamp. These are the cylindrical (glass tube), type lamps used in the doors, number plate, interior light etc. I removed mine and measured with a vernier, because it was conveniently to hand, but such accuracy is not critical, and 1~2mm tolerance is acceptable. Both (239) bulbs types measure 37mm end to end.
UltraLEDs Products
------------------------------------------------------
5 x (501) Wide Angle Green Led 30% Brighter () = £10.00 (Dash board, and heater controls)
2 x (239) 36 -39mm Xenon White Dome Light (9 Leds) New Voltage Reg V () = £9.98 (Number plate)
5 x (286) Dash Board Slim wedge bulb Green (New Brighter) () = £7.35 (Window switches, cigar lighters)
2 x (239) 36 -39mm Bright Red Dome Light (9 Leds) New Super Bright () = £9.98 (Door lamps)
------------------------------------------------------
Sub-Total: £37.31
Flat Rate (Best Way): £2.00
VAT 17.5%: £5.86
Total: £39.31OK so some are a little pricy, and possibly the number plate lights were excessive, as the plastic lenses are below the lamps in this case, so not as susceptible to heat as the vertically mounted door lenses. But I was curious to see an LED used as an external light, not just for interior cosmetics. The results were interesting, and I fitted only one initially so as to make a comparison. What strikes you the most is just how non-white the lamps really are, when you see one alongside a pure white LED. Brightness was about the same, but the LEDs were simply more visible, no surprise really, a broad spectrum white is covering 3 times the bandwidth of a tungsten lamp. Oh and those red door lights are VERY red now! Remember we are delivering pure red light through a red lens.
At this stage I should point out you must remember to "tune" the 239 type packages, because they emit light from only one side, around a 180° arc, so you must rotate them in the sockets, in effect aiming the light at the Lotus cover lens, otherwise you will do a good job lighting the enclosure, but little light will come through the cover lens to the outside.
This is not relevant for the 501 and 286 packages, because the light comes out a built in lens in the end. Incidentally 239 package will also fit the interior roof light, but I forgot to order one extra, ah well next time I guess. For those trying to make some other impression, UltraLEDs also have 239 packages, (and many others) that cycle (phase) through the spectrum, for example starting red, fading into orange, yellow, green, blue etc etc a disco in your Lotus, not for all tastes (or mine), but to each his own!.
All product descriptions are from the UltraLEDS website, and refer to the items I ordered for my Esprit, but other options, (brighter, phasing, colours), are also possible and available there..
Comparisons Esprit Lamps and LEDs
(501) Wide Angle Green Led 30% Brighter
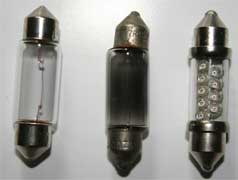
Here you can see the original lamps that came out of the heater controls of my 1982 Turbo.
Notice the glass envelopes are scorched, and glazed, this is due to contamination of the glass, no doubt by the person who originally installed them, touching the glass in the process, and leaving their skin oils behind, to later burn in..
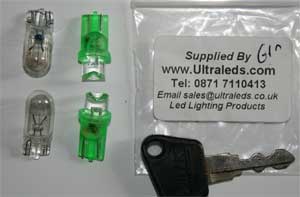
The key you will recognise is from the petrol caps, and simply there for scale.
(501) Wide Angle Green Led 30% Brighter
Here is a close-up shot of the same lamps where you can clearly see the melted plastic on the old lamp's envelope. (Note in this shot it appears the LED is larger, this is due to lens distortion of my macro lens, and actually both are EXACTLY the same dimensions, and fit perfectly in the original Lotus sockets.
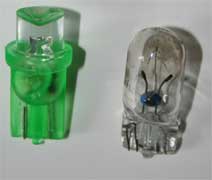
(286) Dash Board Slim wedge bulb Green (New Brighter)
Here you can see the type 286, which are in fact about 3mm longer over all, but all the same fit perfectly.
Yet again you can see the original Lotus lamp, badly scorched.
I have included the Lotus lamp socket, from the door cigar lighters again for scale.
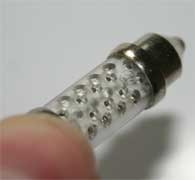
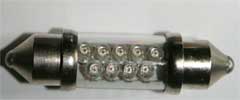
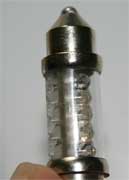
(239) 36 -39mm Bright Red Dome Light (9 Leds) New Super Bright
(239) 36 -39mm Xenon White Dome Light (9 Leds) New Voltage Reg V
Here is a shot of the 239 package, WHICH YOU MUST SPECIFY the length of, when ordering.
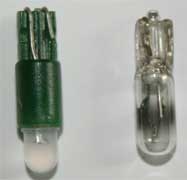
Also for those still unconvinced about what skin oils do to glass lamp envelopes after they heat up,
Take a look at the middle lamp, removed from my passenger door (amazingly still working, but very weakly). No wonder the LEDs look so bright, when the old lamp is totally black. I included a new one on the left for comparison.
Also notice how our new LED is totally transparent, with no indication of what coloured light will be emitted. So don’t mix them up, if you order different colours ;-)
Also you can see these LEDs, are actually miniature arrays, in this case using 9 minute LEDs.
This gives better light distribution, rather than the normal semi focussed beam from a typical LED.
(239) 36 -39mm Bright Red Dome Light (9 Leds) New Super Bright
(239) 36 -39mm Xenon White Dome Light (9 Leds) New Voltage Reg V
Here are a couple more shots, where you can see these are very well made.
The left shot is from the side, where you see the LEDs are to the right of the centre line, and on the opposite side there are small ventilation holes, as they do generate some heat, but nothing compared to the lamps. To give you an idea, I removed this one for the photo shoot, and even after hunting for the screwdriver, and taking the other photos to come, the LED was still cold to touch, after 10 minutes of operation. Where as the original lamps I removed actually burnt my fingers, when I came to remove the second door.
I’m not sure if my Esprit is normal, but if you open EITHER door, BOTH door lamps come on, (even if the other door remains closed), so be careful, when you come to changing the second door lamp, because it was very hot in my case, so hot I just dropped it.
The photo on the right gives you a better view of the vent holes. NO light comes from the side with the holes.
General Fitting (1982 Turbo)
I will not be covering the methods already documented in the Lotus Service notes, and on LEW, as these vary somewhat depending on model and year. Also it is my intention to completely replace ALL the lamps in my Esprit with LEDs, including the binnacle warning lamps, but that will be done later. For now I’m only addressing the current problems I have with my Esprit.
Tools:
Flat Blade screw driver 5mm
#1 Phillips
#2 Phillips
Jewellers 2 mm flat blade
2mm Allen Key
Insulation tape
Possibly: (window switches if melted)
Soldering iron
Solder
Heat shrink 2mm & 7mm
30cm length of twin core 2mm wire,
4 IDC crimps, Molgrips, or Electricians PliersDuration:
Fitting Heater lamps (3) allow 1 hour total.
Cigar lighter lamps (2) allow 30 minutes total.
Door lights (2) allow 10 minutes total.
Number plate lights (2) allow 10 minutes total.WARNINGS!
Be careful, and consider disconnecting the car battery first! (I did not, but I am typically working with very high voltages, so know where NOT to put my fingers ;-) Also remember your car may differ from mine, so always consult your specific models service manual. IMHO no special skills are required, but I suggest you read this entire guide FIRST.If something is not clear, I’d be happy to help, and you can email me.
HOWEVER I accept absolutely NO responsibility for any injury or damage what so ever.
For the timid, I have only had my Esprit two weeks, and had no problems with the mod, and actually I would consider this an easy starting project, for first timers.
Fitting: Heater Controls ("green" backlighting lamps)
(501) Wide Angle Green Led 30% Brighter (Heater controls, dash etc)
These are really simple to replace, but getting to them is a bit of work.
So far I have only replaced my heater controls, but these lamps are also behind the dash.
(I have not changed them there yet, as my current lamps are all working, and I have too many other things to sort, that are not working. But I will update this when I’m done). Also in most cases the duty cycles are very short in the binnacle, as the lamps are warnings only, and therefore hopefully not lit for long, where as the illumination lights are always on with the headlights, and often on permanently (windows, cigar lighters)Heater controls: This basically involves removing the centre armrest, then the Choke/window switch
panel, and finally the heater knobs, and facia. In my case two of the three lamp sockets had fallen out of
the metal panel, so I had to also remove the entire top console around the gear stick. I didn’t know what was behind there at the time, and as I have just a hole where the radio head unit should be, perhaps in hindsight, it would have been possible to fish about behind there, and find the lamp holders, (assuming the radio is removed.)
#1 Remove the heater knobs, rotate them until you see a small hole, poke a 2mm Allen key in there, depressing the tiny button, (it is NOT a screw), and then ease the knob off.
#2 Remove the Fan speed knob which is attached with a small screw, so a straight jewellers screwdriver is required.
I have no A/C but assume that knob is screwed also#3 Remove the Facia: Once the knobs are all off, you will see some small screws holding the facia in place, remove them all, and ease off the facia to the front, being careful not to twist it, and scratch the leather etc.
If you are lucky at this point you will see all the lamps sitting in their sockets in the metal plate behind.
If the lamps have been on, be careful they may still be very hot.
#4 Remove the old lamps: They "simply" pull out toward you. I used a surgical rubber glove simply for grip, as only the envelope domes protrude and I found it hard to get a grip on them. Once they are all out, inspect the sockets, (one of mine was bent inside), again making sure the contacts are aligned. (Again a jeweller’s screwdriver came in handy to gently lever the contacts back to the correct positions.
These contacts should be shaped like a "U" on each side of the socket.#5 Insert the new LEDs: I also supported the lamp sockets from behind when doing this, as I suspected that was how they fell out in the first place. This is very easy without a radio. Before you reassemble the console, wipe off the surfaces of the LEDs, and then turn the lights on, and check they are all working.
(I was glad I did this, because then I discovered my bent socket contacts, and would have been rather unhappy to have to strip it all down again just for that) Also don’t assemble the choke/window switch panel yet, if you intend on replacing the window switches.End.
Fitting: Window Switch ("green" backlighting lamps)
(286) Dash Board Slim wedge bulb Green (New Brighter)
These are used in a few places, and first I will describe fitting to window switches, (cigar lighters next section). In my case the existing lamps, had had their legs bent straight, and a 10cm twincore extension wire crudely twisted around the legs, and taped over, with the other ends of the wire poked through the switch plugs off the cars loom. The lamps were only held in place again with insulation tape, ironically also insulating the heat, and gum burning on the envelopes, and melting my switches. I have no idea if this is normal in an Esprit as it leaves the factory, but to me to totally unacceptable. If you find you have sockets behind the switches, then just pull out the old lamps, and slot in the LEDs. Don’t forget to wipe them off.#1 Remove the Choke/Window switch panel. (Assuming it is fitted already)
#2 Remove the old lamps. If you have no lamp sockets, be sure to make a note of where the lamp wires are connected.
#3 If you have lamp sockets, just plug in the LEDs, check they work, (if not, remove and check the socket pin alignment). Reassemble the panel and your done.
If like me you have no lamps sockets, see the section #3.1
#3.1 AIM: To solder on extension wires to the LED legs, so they can then be more easily connected to the cars wiring loom. Try to avoid insulation tape at all costs, it is not a good long term solution for insulating bare conductors, heat shrink is as cheap, secure, and adds rigidity.
#3.2 Gently straighten the LED legs, by first levering them up from the plastic, with the jeweller’s screwdriver, and then straightening them by hand. I suggest you DO NOT use any pliers for this, as they tend to make creases in the metal, and these can then crack, making soldering tricky, or if too close, rendering the LED useless.
#3.3 I made up new extension wires for my LEDs. This is best done on a flat table. Take a 15cm length of twin core wire. (2mm gauge) Separate the two wires by splitting the insulation, strip back the wire 5mm, slide on enough heat shrink to cover the entire length of the LED leg, soldered section, and at least 5mm more of the wire insulation. Be sure you have separated the two conductors enough, that the heat shrink is more than 5mm away from the solder point, otherwise it will shrink when you are soldering. Tin the conductors, and solder one wire to each LED leg. Once the solder has cooled, check you have clean smooth solder points shiny silver is a good sign, if they are duller matt finish, that is not good, so solder them again. Slide up the heat shrink to cover the first solder joint, and if you have a blow torch attachment use it to heat and evenly shrink the entire heat shrink, then repeat with the second joint. If you do not have a blow torch, you can use a lighter, or even match, but these tend to burn or char the heat shrink, so be quick and careful. Repeat the procedure for the second LED. Additionally I slid on a larger single heat shrink extending from the base of the LED, (stepped part), all the way back passed the other two heat shrinks. This gave more rigidity, a better surface to tape against, and generally looks more professional. It is worth pointing out one could indeed purchase some lamp sockets, and solder them in instead. However I decided this was pointless, and another point of potential failure.
I had no sockets to hand, and was not sure about the size and fitting behind the switches. Then consider you really only need sockets because the lamps WILL blow in time, and the LEDs are very unlikely to do so, at least not in my life time.#3.4 Join the extension wires to the cars loom with 2 IDC crimps for each wire. (IDC = Insulation Displacement Connector) and these are common and available at any garage, or car audio shop. They are simply a little metal fork, that cuts through the insulation and wedges the wire, creating an insulated and secure connection. They are double sided for splicing in. One side allows the existing wire to pass through, while the new wire sits alongside. Be sure you use the same gauge wire as the existing loom, current is not the issue here, but the IDC crimp is, and if the size is not correct can cut your loom, or new wire.
#3.5 Finally align the LEDs behind the switches, turn them on to assess light coverage, and then tape around the entire switch (insulation tape IS good for this, as the surfaces are flat, and the PVC tape deforms over the bumps etc.
#3.6 Reattach the mounting panel, and centre armrest.
End.
Fitting: Cigar lighter illumination ("green" backlighting lamps)
(286) Dash Board Slim wedge bulb Green (New Brighter)
Door Cigar lighters: These are really much easier to replace than the window switches.Do one door at a time!
Removal of the inner door trim panels is well described elsewhere, and you should consult the instruction for you model. Basically this involves removing the interior door handle/lock trim, and allowing the mechanism to fit back behind the trim panel. (loosen the three screws, remove top and bottom trim etc) Then you have to remove one small screw on both the trim panel ends, and you can pull the trim away from the lower edge, and once free, lift the panel UP and off.
CAUTION: remember you have wires attached behind, so keep the trim panel close to the door. In my case, I didn’t disconnect any wires, because they were already disconnected. But if you have to, I suggest you make notes as to where they all go. Hopefully you will have enough slack, that you can leave them connected.
#1 Removal: Look at the Cigar lighter, and you will see two insulated spade connections at the base, (Purple wires in my case), and one round connector (red wire?), with heat shrink. This round one is the lamp power, and connects to the lamp socket shown above. Grasp the connector as close to the black lamp socket base as possible and gently pull it down, hopefully the connector will have a better grip than the lamp socket, and they will come out together. If the connector comes off, leaving the socket in place, you can then simply pull the brass pin at the socket base, to remove it. Then pull out the old lamp.
#2 Inspect the socket: Straighten internal connectors as before if required.
#3 Insert your new LED, CHECK it works, (If not you may be using polarised LEDs, try removing, turning 180° and reinserting.
#4 Reassemble. NOTE in my case the driver's door light (discussed next), was not working.
I discovered the wire had fallen off inside, and this was much easier to get at, with the door trim panel off, so you may like to check yours before you reassemble the trim panel now.end.
Fitting: Door open lights. (Red) & Number plate lights (white) The fittings are the same.
(239) 36 -39mm Bright Red Dome Light (9 Leds) New Super Bright
(239) 36 -39mm Xenon White Dome Light (9 Leds) New Voltage Reg V
These 239s are fitted in many places, and here I will describe only the doors, but the fitting procedure is the same for the number plate lights, just the plastic is either clear or red.#1 Open the first door, remove both screws with a #2 Phillips screwdriver.
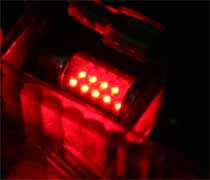
#2 Gently pull the lens away about 10mm, you will find one side is trapped behind the door panel. At this point you have to ease the free end out a bit further, and then slide out the trapped end. See below, (bright aren’t they, certainly fooled the cameras meter, hence the blasted pic below)
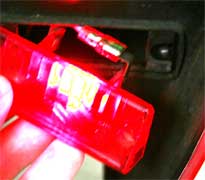
One nice thing here is you do not have to worry about shorting on a metal door, as everything is GRP. This pic shows an LED, because I had done my fitting already, before I considered maybe some others would like a walk through guide.#3 Simply unclip the existing lamp while supporting the fragile plastic legs of the lens.
(CAUTION it may be very VERY hot), I removed my lenses completely and washed them under warm water with an old toothbrush, because they were very black, scorched, and dirty. Be VERY careful with the electrical connections, as they are riveted to two FRAGILE plastic legs protruding from the back of the lens, and mine were already cracked.
#4 Insert the new LED, remembering to support the fragile plastic legs of the Lotus lens.
Here you see an un-tweaked shot, spot metered on the LEDs, where you can see they are even more red than the plastic lens.
#5 Align the LED: Before you reinstall the lens, remember to align (tune) the LED because the light is emitted from only one side. I sat on the ground, to get my eye level low enough, and rotated the LED in the socket until I had even illumination coverage. I gave it a wipe first, and rotated by touching the metal end only. This is really just a result of habit or working with precision optics, as I do.
End
Fitting: Number plate lights (white) (Basic method above)
If you are also replacing your number plate lamps with LEDs, you will find the task identical, because the fittings are the same, just in clear plastic. As I am missing my boot lining, I was able to tune the illumination coverage from inside the boot, once they were screwed back in place. But equally you can clearly see the coverage, as they are very bright, and remember you are looking at the light distribution on number plate, do not look at the LED.
Finally don’t forget to again check the coverage on the number plate again once it is dark.
Verdict
In summary, it took me less than 1 hour to replace all the lamps described in this guide, but mainly because I had already disassembled the sections, to work out the problems I had, and what type of lamps were in there. Therefore I had left some parts disassembled while doing my internet research, ordering and awaiting delivery etc.
But then again I am new to Esprit’s, so on a steep learning curve right
now, and consider myself grossly inexperienced.
Having said that, I can see no reason to fear such a task described here, but
ultimately you have to make that decision for yourself.
Please realise this the first Esprit guide I have written, it probably contains
a few minor errors, and I do not consider it a definitive description, but hopefully
it will help some Esprit owners, and if you have any questions, I’d be
happy to help.
![]()
This mod was performed by Carl Pedersen on his 1982 Turbo Esprit.
If you have any comments, feel free to e-mail me with at admin@lotusespritworld.com
|
|