
Rear Brake Discs & Pads
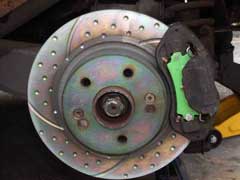
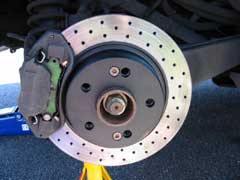
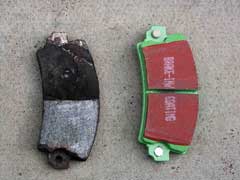
With most Esprit braking systems not living up to the performance of the car, looking after you brakes is a must. When my rear pads needed changing, I decided to upgrade the pads and also the discs to help improve the braking performance. I chose some EBC GreenStuff pads and got some original Lotus rear discs (currently on Lotus discs available for the rears) drilled (supplied by Ramspott & Brandt). There are other options depending on how much money you wish to spend, including new calipers with bigger discs.
Changing Brake Discs and Pads is part of routine maintenance that has to been done as the parts wear out. You should check your brakes regularly for signs of wear and leaks in the system. Pads need checking and changing more regularly than the discs, but remember if you're pad wear too badly, you will damage your discs. So don't let them.
Changing these parts isn't as difficult as you might think. This guide will show you the basics to changing the rear brake discs and pads (a full guide to the fronts will follow). This guide as been done using my 92 SE which carries the Bendix rear set-up, but the basics are the same on most models. There are a few fiddley bits when putting the new pads into the calipers, as they are sometimes a tight fit and the clips are difficult to fit. And of course the possibility of something seizing or rusting. But if you system is in good condition, doing-it-yourself isn't difficult.
|
You will need the following parts: Rear
Brake Discs (pair) €540 |
You will need the following tools: Jack
and Axle Stands |

Removal & Fitting
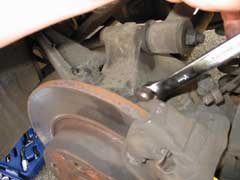
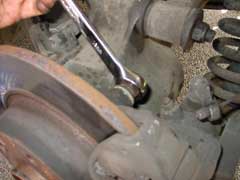
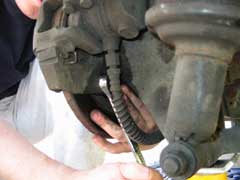
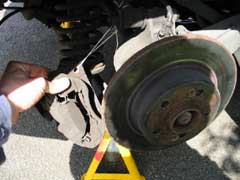
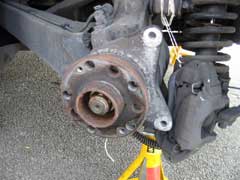
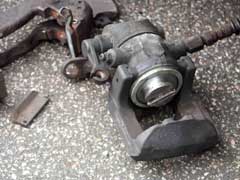
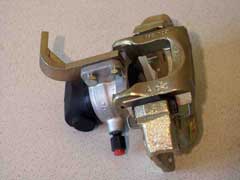
Once the Esprit is jacked up and place securely on Axle stands, you can remove the wheel. Remember to loosen the wheel nuts before jacking (always forget this one). Remove the rear wheel. You can then start to remove the caliper from it's mounting. It's worth noting that you might want to have a go a loosening the two disc screws, while the calipers are holding the disc steady. There are two 19mm bolts holding the caliper on. One at the top and one at the bottom. You can only get at these from behind the caliper.
You may find these quite stiff. Remember if you are using WD40, do not get any on the discs or pads, as this will effect braking performance. Once the two bolts have been removed, you'll find the caliper still stuck to the disc. Time to remove the handbrake! You'll still find the caliper gripping the disc quite strongly. I used a rubber mallet to gently knock the caliper off the disc
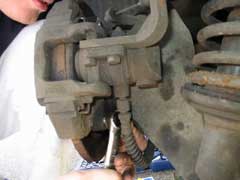
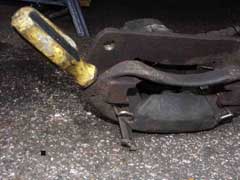
Use some string to hold the caliper, as it will still be attached to the brake hoses and you don't want any extra pressure on those. Removing the pads is simple enough (sorry, forgot to take pictures!). Remove the two clips at the top of each pad. You can then normally push the pads out of the caliper. If not a tap on the back with a screwdriver will help. Remember which way everything fitted together, as this will help when putting the new pads in.
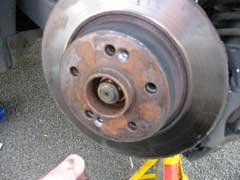
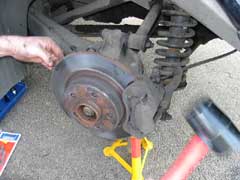
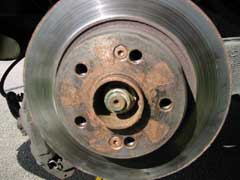
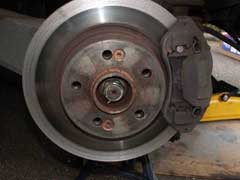
Now for removing the discs. You will need a large star head for your screw driver to undo the two screws holding the disc on. These can be found at any car accessory shop and aren't expensive. Now this could be a difficult job depending on who changed the discs last time, as some people tend to lock-tight (glue) this screws in. You might find it easier to loosen the screws with the calipers still holding the disc. Mine where easy to remove (luckily)! Once these screws are removed, simply lift the disc off the hub. Some people have to drill out the screws and then leave them off, as the wheel/caliper with hold the disc in place.
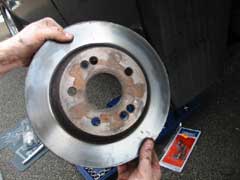


Now swap the old disc for the new one and replace the two screws. Now that's the easy bit. Replacing the pads is a bit more tricky. Another pair of hands is very helpful at this point (although I didn't have any!).
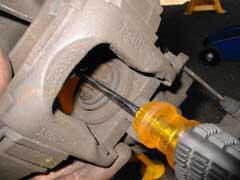
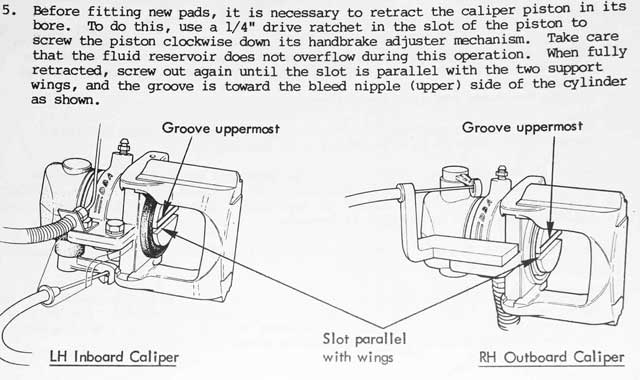
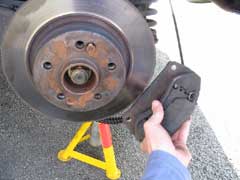
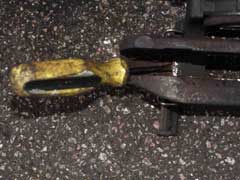
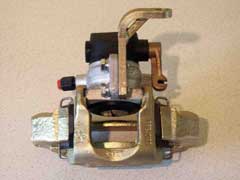
Again a lack of pictures (sorry, hands full) doesn't help. The basics are easy. The reality is a little different. Firstly you'll need to wind the caliper piston back in to fit new pads (this is only for rear calipers as they contain the handbrake attachment, Front calipers normally push back in), as you'll never get them back on the disc if you don't. You'll see the piston has a gap cut into it (like a screwhead). This needs to be turned anti-clockwise to retracted the piston. This is very stiff at first, but easys off. I used the stem of a screwdriver to turn the caliper piston (see pic above left).
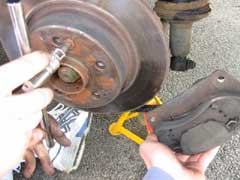
Once the piston is back in, you can fit the new pads (see note at the very bottom of page for lining up the pistion). These need to be pushed into the caliper and the clips replaced. These sometimes need a little help, as the clips can be very stiff. The use of a flat-head screwdriver helped me. Once the pad are back in the caliper, you can slot it back onto the disc. This shouldn't be too tight if you've wound the piston back. Align the caliper and replace the two 19mm bolts. Making sure there done up tightly. Check everything over once more before replacing the wheel. Now just the other side to do!
Remember to put the handbrake back on before taking the Esprit off the jack and axle stands, as you don't want it rolling away! Now you can gentley bed the discs and pads in. Instructions are normailly on the box for the pads. I would recommend removing the wheels again after a short test drive to check everything is tight and in place (remember the brakes will be hot directly after a drive!).

Verdict
LEW's verdict on changing the brakes depends on how hands-on you are with your Esprit. Brakes are a very important part of any car, and if you're not confident about performing the task, leave it to someone who knows what they're doing. For those who are happy to work on their Esprit's, changing these parts shouldn't cause you any more headaches than any other maintenance you've done. It should take around 3-4 hours depending on you and your Esprit.
As performance goes, it's difficult to tell as the rears do very little of the braking. But why put original parts back on when you can pay a little more (and sometimes a little less) for better quality parts. Remember if they help you stop 1 metre quicker, it could save your Esprit and maybe even your life. We needed to change the worn parts and by choosing to upgrade we now have a rear system that's an improvement over standard, both maintenance & modifications and all in the name of safety. Perfect!
This mod was performed by LEW on their 1992 Esprit SE.
![]()
If you follow this guide or think you can add to it. Feel free to e-mail us with your opinion on it and I can add it to this page. kato@lotusespritworld.com.
LEW Users View
My discs wouldn't come off easily, so I bashed them with a hammer and piece of wood around the hub area, rotating them so I hit a different place each time. It was then necessary to bash them from behind (and rotate again) before they would come off. I wasn't sure if I'd missed a nut or bolt but there are only the 2 on the face of the disc that you mention. It probably took 10 minutes of bashing to remove each disc. The 2 bolts in each disc came out very easily - one side slightly harder than the other as the heads had been dimpled to avoid loosening. A puller would've made this dead easy but I didn't have one.
One question for you: Is it OK to leave the car on a trolley jack for 3 or 4 days? It is lifting the car by the chassis rail below the gearbox (U-shaped piece of metal). Or should I drop it onto axel stands / blocks of wood. If the latter, where should I position them?
Thanks,
Jason
'89 SE
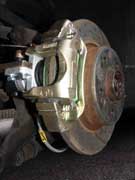
I've just had a go at replacing the rear discs and pads on my 89 Esprit Turbo, with your article as my inspiration. I used EBC Green Stuff Pads along with EBC solid "Turbo Grooved" and drilled discs. These items certainly look a lot better than the plain originals, I'm pleased with the result... shame they're not visible from behind the original Oz Routes alloys!

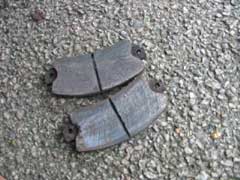
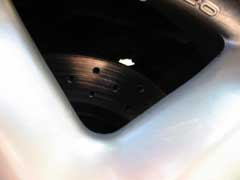
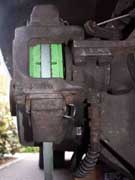
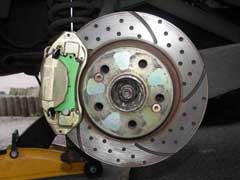
Firstly, a word of warning to anyone who thinks that passing an MOT means your pads are fine. My car was MOT'd only 2000 very sedate miles ago, yet as you can see from the photos the pads were completely gone! The only way to be sure is to take the wheel off and look through the back of the caliper, as can be clearly seen in the finished photo.
Remember that the bolts holding the calipers are behind and therefore reversed, so from the kerb, you will want to turn them right not left, to loosen the 19mm bolts. When trying to retract the piston, I found it was far easier to dismantle the caliper, this only takes a couple of minutes and allows the screwdriver to turn completely without fouling on the caliper. To dismantle the caliper, just remove the small spring clip and then tap out the small wedge. This needs to be slotted back, which is actually quite easy if you put a screwdriver down between the gap first. I also found that it was not necessary to tie up my caliper, the Esprit is so close to the ground that I could lay the caliper on the floor, the hose is long enough to reach with plenty to spare and therefore there was no strain on the hose.
Colin
89 Turbo
I've since been having problems trying to adjust the handbrake. I don't know whether it matters, but having read up the service manual I've just noticed that the piston should be turned clockwise to wind it back, but then turned anticlockwise just half a turn until the notch is upper most.
I had noticed this notch on the piston, but didn't think anything about it because didn't remember any reference to in on the Lotus Esprit World page. If it is important, then it might be helpful to others to add this to the page as well. I've now got to take the lot off again to see which way up I left the pistons!
Oh, I don't know if anyone would be interested, but the 2 x Turbo Groove discs and the rear axle set of Greenstuff pads came to a total of £240 including VAT and Postage from Powerstop. Delivery was within 2 days.
Obviously, not as good as the PNM vented conversion, but a worthwhile upgrade nevertheless, especially for anyone on a smaller budget. They are a closer alternative to the Ramspott & Brandt drilled solid units.
Very best regards
Colin
I've just had my rear calipers rebuilt, I think they did a really great job of them. I've gone for sticking with the originals. I had previously replaced the discs with some EBC grooved and dotted ones which seem to be better than the originals. Having got the brake calipers back, I must say that as well as being amazed at how "new" they look, I can now see that the calipers were not working properly beforehand. As the piston pushed one pad into contact with the disc, the pad on the other side should be pulled in. Previously, my calipers would slide together providing I hit them with a hammer! I didn't realise how easy the two parts of the caliper should slide together. The difference is astounding. While I was at it, I also replaced the brake hoses with a Goodridge braided set.
Anyway, here are a few photos just in case you're interested in taking a look. I included one of the calipers still on the car before being rebuilt, to show the difference.
It was "Classicar Automotive" Unit A, Alderley Road, Chelford, Cheshire (01625 860910) who supplied this calipers. There always have a half page advert in Club Lotus magazine, mostly for pads and seal kits. The latest adverts show a web address but I cannot get to it.
I'd highly recommend them, they do have some ready to send out - you then send your old ones back, but they didn't have any drivers side in stock and need to chase some previous customers. So I sent mine off and it took a couple of weeks, which was longer than I was hoping, but I'd sooner they take the time to do a quality job. It's also worth noting that they didn't want any payment until the job was done, when they phoned to arrange delivery.
I would have gone to SJ Sportscars, who seem to do a similar job (they have a photo on the parts page http://www.sjsportscars.co.uk and I think are a little bit cheaper, but they were closed for a couple of weeks over Christmas.Colin Mant
|
|