ECU Performance Chips
for 4-Cylinder GM Fuel-Injection Esprits
The Esprit's ECU (Engine Management) controls the cars performance, running its program to decide how much fuel and air should be burnt and what boost should be allowed. It also monitors how the Esprit is running to make its decisions, taking readings from the manifold, throttle position, coolant temperature, oxygen sensor, among others. The ECU also learns how the Esprit is running and can change its settings depending on different aspects. This whole subject could have a whole website devoted to it, so we'll leave it there, as we're more interested in improving performance.
The standard chip programmed by Lotus has it's settings governed by many aspects, but once its left the factory, you can change these to help increase performance and general driveability. To learn more about this, see the Performance Chips page, were I test different chips and explaining what they do and how they change the Esprit's performance. This page is really just to show you how to change your chip to a better performing one.
|
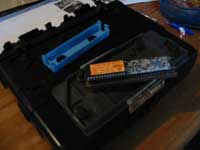
You will need the following parts: ECU
Chip |
You will need the following tools: Screwdriver |
ECU Removal
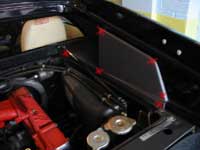
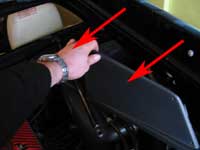
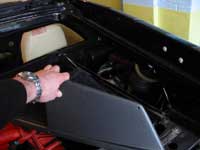
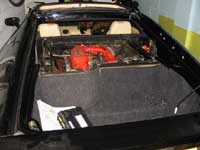
To change the chip, you'll need to take the Esprit's computer (ECU) out of the car. The ECU is located in the engine compartment, on the left-hand side, behind the airfilter (4-cylinder Esprits). It's easier to sit in the rear of the Esprit, to reach the six screws that hold the cover in place. Remove these screws and carefully pull out the cover.
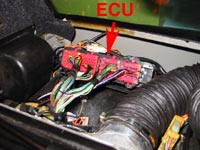
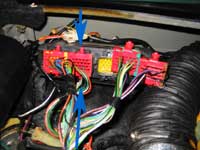
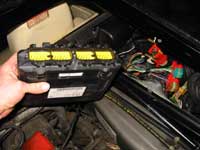
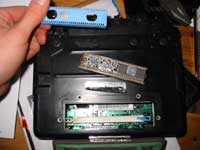
You'll see the ECU as soon as the covers removed. It's the black box with four large red connectors attached to it. You now need to remove the wires from the ECU. Push down top and bottom of each connector and pull them off. Mine were a little stiff and needed pushing down quite hard. (If you don't want to disconnect the ECU, you can turn it over and remover the chip while it's still attached). Remember to note which connector is attached in which order. This will help when replacing the ECU.
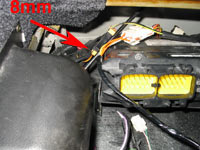
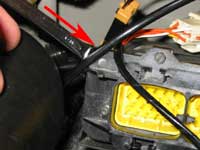
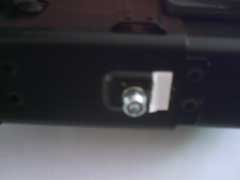
The ECU is held into the Esprit by two 8mm nuts. Mine only had one of these on the left-hand side. Space is at a minimum, so you'll find it difficult to get a socket in. I used a spanner and could on get a quarter turn on it. So it took a while to undo! Be careful not to lose the nut once it's off. As I don't think these are readily available. The thread is on a small backing plate, which slides into the ECU.
The ECU is easily removable once these nuts are removed. You can now take your ECU from the Esprit and somewhere safer than your garage to remove the chip.
Chip Installation
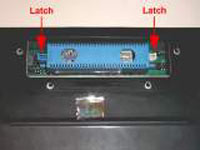
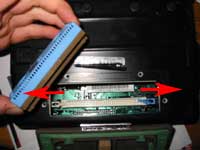
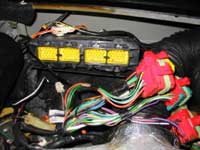
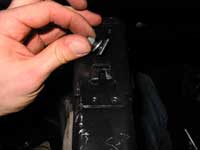
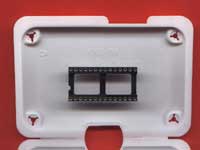
Turn the ECU upside down and you'll see a cover attached by 4 small nuts. These seem to be an imperial size, as none of my spanners would fit. It's between a 6mm and 7mm. These can be easily undone with some pliers, as they aren't too tight. You'll also see a sticker over this cover, warning that if you remove it, your warranty will be invalid. So take this into consideration before doing this. As mine is out of its warranty, I didn't have to worry. Once the cover is off. Look inside and you'll see a blue cover. It's held in place by two clips. These need releasing, by pulling away from the Chip holder and down. Once the clips have been released, you can pull out the holder.
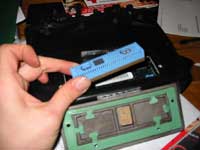
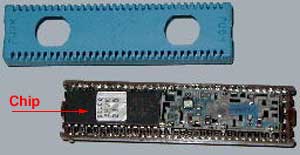
To see the chip, remove the blue cover. You may need a small screwdriver to release the clips on each side. You'll see two chips, one with circuits on it and one plain black with a sticker on it. This is the chip we are replacing. Before you do anything else, note which side the notch on the chip is, as you'll need to put your new chip in the same way.
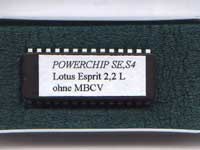
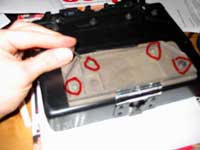
Your new chip is supplied with a chip holder. This is what will replace the chip, this will then allow you to change the chips. Now if you're happy to do the soldering yourself, take a pair of scissors and carefully cut the 28 connectors holding the chip in. You can then solder the holder into the space where the chips just been removed from. I decided to get someone proficient to do my soldering. I took it to a TV Repair company, who did this for me. You could also take it to a computer repair shop or any place than can solder chips.
Once the holder has been soldered in. All you now need to do is attach the chip to the holder and replace the blue cover. My cover didn't fit as the holder had been soldered a little to high on the board. This isn't a problem as you can leave it off. Mine was attached with some electrical tape as only one side wouldn't clip down. Replace the cover and reattach the four screws. You can now reattach the ECU to the Esprit. Once everything is replace, you can now start your Esprit and test your chip.
LEW's Verdict
I was a bit worried about messing around with something I knew nothing about (hasn't stopped me before). But the whole process was very easy and could be done (not including the soldering) in under an hour. Once the chip holder is in, you can swap chips around easily, either increasing or decreasing the Esprit's performance.
If you've thought about getting a chip before and were worried about fitting, Don't, it's easy. As for the chips and what they do. I'll be testing 3 of Marcus Freudhöfer Esprit chips and giving you a run down on how they change the Esprit. I'll be testing an S4s based chip, with some small improvements. A high-torque chip, which produces 18% more torque and a Performance chip, which increase bhp. See this Chip guide here when it's done.
Feel free to e-mail me with your opinion on this guide and we can add it to this page. admin@lotusespritworld.com
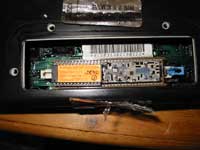
![]()

I have just installed a #3 chip using the WC Engineering mem cal adaptor board (also available from PUK). I couldn't find any pictures of one installed, so here's some in case you want to update your install guide with this option.
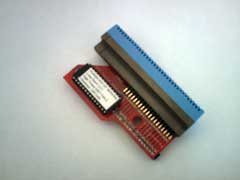
Adaptor board with chip and a memcal inserted ready for install.
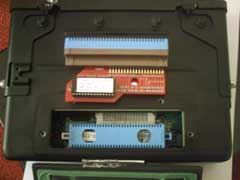
Open ECU showing a standard memcal installed, and the adaptor board placed on top ready for install, to show how it will fit in comparison. I have used a spare memcal here to show this.
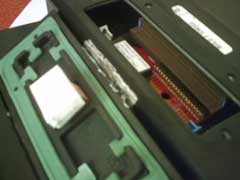
Adaptor board installed.
The adaptor board sits a lot lower than a memcal, and the side clips that normally hold the memcal firmly in place do not grip the adaptor board. There is also a block on the ECU cover that would normally touch the top of the memcal when closed, but again this does not reach the adaptor board. The board did wobble a little, so I used sticky foam pads to build up the height of the block. They will sit on top of the adaptor board.when the cover is closed, stabilizing it and preventing it from working loose.
I used small sticky foam pads in front of the ECU clamps to stop them moving when reinstalling the ECU. They can slide out easily, and given the restricted space they are easily lost.
This adaptor board makes updating the chip very easy without the need to modify the memcal. Given how rare memcals are becoming, this is a good totally reversible solution, eliminating any risks involved in removing the existing chip and installing a socket on a memcal.
Russell Bosier - 89 SE Turbo
May 2009
|
|